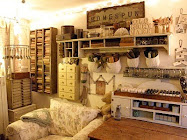
The floors are clearing on the second day.
We added a cupboard that was stored
in the garage unseen and unloved.
We began storing crafts and supplies
in the two stacks
of vintage suitcases on each side.
There will be a comfy chair in this corner once
the walls are painted.
and another one here
next to second stack of cases
We began playing with trim options.
Paper/Lace or Ribbon trim?
I couldn't resist placing some Easter up here.
Books are moving to baskets on floor.
Up here for safekeeping now.
I'm voting for the paper one.
It is more work but more charming.
Cost of 3 paper rolls 6.00
Actually free since they were in my stash for
years and I donated to the cause..
I showed her with a small sample board
what "we" could make and insert behind mantel.
I left her a large vintage dictionary.
Homework for Annie, hehe
Storage areas above will be draped and hidden
once we make casings and hem panels.
Some more playing with treasures.
Arranging more storage.
The exposed baskets hold gift bags
and gift wrapping supplies.
At her fingertips but still pretty
So....progress on day 2
Schedules mean we work here and there
but we've rounded the bend.
Next phase
PAINT
and a flooring choice.
Not bad for a wee bit of elbow
grease and lots of
sorting by Annie.
Stay tuned for paint reveal.


11 comments:
I'm sure it was hard work....but how fun to play with all that cool stuff! Glad you are sharing. I think I just may be inspired!
Lots of hard work there. The sorting is worth a good reward (like chocolate).
Very creative use of storage and space. I like the paper trim too.
Wow, she has a lot of suitcases.
You do good work, my friend. It is indeed shaping up rather nicely!
Thought of you on Sunday when I was watching My Favorite Year on TCM.
xo
Claudia
It is looking so cute! Lots of work but well worth it I think!
Coming along well! I do a lot of collage with mod Podge , however when making things like the dictionary sample lard I use liquid starch to adhere papers! Just brush it on the object, apply paper and rub with a soft cloth to remove any air bubbles. Let it dry..no splotches, just dries like there is no adhesive and when you want to change the covering just wet it and the paper comes off. I've used this to attach fabric to shelves too and or works just as good as it does with paper.
You are such inspiration for me to use my new unused shed out back to put all my want to sell items in it. Just arrange it nicely for my next Back Yard Sale
THANKS xoxoxo
her shed looks fabulous already with out the flooring in
Wow, your shed is fantastic. I could spend hours in there, just looking at all of your goodies (books, Easter lambs and rabbits,and your wonderful suitcases. Great space!!!!
Your little shed is looking great. You have so many great finds. Love it all. Jo
WOW! You do have a way with space and stuff :-)
I adore the way it is coming together and things stored where they can be "stored" and look pretty at the same time. Well done!
Thank you Bonnie and Jean Bee! You are no reply bloggers so I'll respond here : D
Post a Comment