BAG IT!
This tutorial will show you how very simple it is to make your own
reusable grocery bags, gift bags, lunch bags etc.
(This is a basic pattern for beginners and yes, it's long... sorry )
Any fabrics can be used, just be sure to consider the bags
usage in choosing the weight of fabric.
I think it is wonderful that stores now sell reusable
bags, but many are not washable, and if using for food products,
food safety is paramount, so make yours washable.
Advanced sewers know that these can be embellished with trims,
pockets etc, but for our purposes at PG, we just want to reduce
plastic bag use and wasteful gift wraps, so simple it is.
For my grocery bag here I used two different
Home Dec fabrics leftover from a purse I had made.
Pre-wash fabrics if necessary.
Size is up to you. I used 17 x 17" squares of fabric but you
can make them any size square or rectangle, the same
method applies for every size.
I used webbing sold by the yard for the handles.
( I had some leftover from another project)
You may make your handles out of fabric
if you wish or some other sturdy material,
I rotary cut two lining pieces 17x17 and two outer fabrics 17x17
I cut two pieces of webbing 20" each.

Place one end of one handle 6" in from edge of top side of lining.
(right side of fabric)
Place other end of handle 6" in from other top side of fabric.
The webbing end is flush with the end of your lining,
and make sure you do not twist handle.
If you are using a print that has direction make sure the handles
are placed at the "top" edge of the fabric, or your
design may be sideways or upside down.

Now, lay your outer fabric right side down or right sides together (RST)
Line up your edges perfectly, and again make sure the "top" of your fabric,
if there is one, is placed correctly. I use a 1/2" seam.

Sew this seam.
I go over several times in area of handle for extra strength.
Repeat with other handle and other lining and outer fabric.

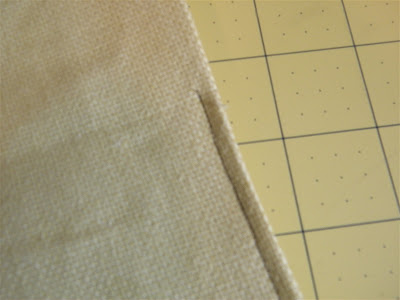
Open the seam and press carefully.
You now have two pieces that (should) look like this.

Keeping the linings together on one side and the outer
fabrics on the other side, flip these two pieces right side together.
Make sure your handles are tucked inside
and that they won't get caught in the seams we are about to sew.

Line up the seams you just sewed on each side. I pin carefully here.
Then pin all they way around the outer edge, leaving an
area open on the lining end for turning.
You can see my opening where I have the double pins.
Prior to sewing it should look like this.
That bump is the handles tucked inside.
Double check before sewing that you have (RST).

This is my opening.
Sew all the away around the outer edges,
leaving that opening for turning.
Trim your fabric on the diagonal in the corners to reduce bulk.

Now, reach in and grab your outer fabric and pull it through the opening.
Pull it all out and push out all your corners in both the lining and outer fabric.
The lining will be all out on one side and the outer fabric will be all out on the other side.

Your lining will have the messy opening on one end.

Iron the edge in neatly and sew across to close.

Now press your lining if needed and push it back into the bag,
making sure to push out all those corners very neatly.
I use a bone folder. Be careful not to poke through fabrics.
This gives you a nice, lined, handled tote without gusset,
but for most items I like a gusset.

So, for that turn the whole bag wrong side out, your
lining is now showing. and tidy up all the corners again.

Putting your fingers inside push one corner as far in as it will go and then
flatten out the corner so it looks like a triangle shape, with the
seam running down the middle.
I marked in 2" with washable marker for a sewing line.
The deeper the inches you mark in the wider the gusset.
So if your bag is much smaller or much larger, adjust the depth.

You can see the sewed opening and the seam running
through the middle of the triangles.

Make sure you have all the corner nicely flattened out in there,
the lining and outer fabric is bulky so take the time to make it
very neat. Sew across this triangle forming the gusset.
Repeat for other side.

Turn bag right side out again and your inside should look like this.
Now, there are fancy ways to have these reversible and no gusset tabs showing,
but I figure if we keep it simple you are more likely to make these in multiples.

The gusset you made.

The lined handled bag you made!

Voila!

From start to finish this size bag does not take even an hour to make.
When I am making these in multiples. I cut out all my squares
and handles one evening, and then sew together another evening.
These totes are a gift all by themselves and the hardest
part is choosing what fabrics to pare together.
(For ease of the tutorial I chose a solid)
I have used old quilts, bedspreads and burlap.
There are no limits to your imagination, and
this is a great way to recycle leftovers from the craft room.
Even a small 6x6" scrap of fabric can become a gift bag for jewelry, or CD's.
A weekend is all it take to make enough to replace all your holiday gift-wrap.
Advanced sewers know that these can be embellished with trims, pockets etc
but for our purposes at PG, we just want to reduce
plastic bag use and wasteful gift wraps.
Please see rules if linking for the first time
and remember to link directly to your Genesis post not just to your blog. All the Genesis posts are archived in my sidebar, so the direct link to posts is required
of everyone. Play nice, and no self promotion please, or I must edit.
Suzan


27 comments:
Very nice. I hadn't thought too much about the fact that you can't wash reusable bags!
I am in the process of learning how to sew...this might make a nice project. Thanks so much!
XO,
Jane
Yep, nicely done. I've been making and selling these for years on ebay and such. Nice tutorial. Hugs. Tammy
GIVEAWAY AT MY PLACE.. come by when you can.
what a clever sewer you are Suzan
I did sew as a child but not since... I totally agree about soft washable shopping bags... I have a few calico ones but this looks so much sturdier... Clever you!!! ciao xxx Julie
~*~LOVE the bag!! And thanks for the tutorial!! Hugs,Rachel~*~
impressive.... but i will have to buy mine. that looks way too hard
good job
~laura x
I have read a bit about reuseable bags holding bacteria.
I think you did agreat job, and they would make a lovely gift.
Thank you for such a beginners guide to making these lovely bags. I will be trying this one. :)
I saw a website that explained how to do these from broken umbrellas. :D
Jules @ Trying To Get Over The Rainbow
hey bag lady, LOVE the excellent instructions! i love this idea because you are right, some of the bought bags are NOT washable. ew. AND yours is stinkin cute!! great idea. thanks for hosting the party.....i almost forgot to join, because of my halloween sugar hang over.....
erin
Nice and easy - the tutorial is great! Though I would like to know how you do that invisble gusset - thing, I'll have to check that out. I do it expect it would be fiddly.
I linked over from a scandinavian blog. I love your barn and horse banner. I see you love roses like I do. Wonderful tutorial and for sharing the love.
Candylei
Great minds think alike Suzan (or is it fools seldom differ?) Love the bag!
Thank you Suzan, this is such a great idea~ I love all the photos and making it visually friendly. I work that way best~
You are so right that many store offered bags are not washable. This is a very good idea. Thanks for the link today. ♥O
I like the gusset part the best! I was wondering as I read the tutorial, "but how will the groceries stand up in the bag" and voila! You answered. Great step by steps and I like the idea of being able to wash them and choose a fabric of my liking. Ann
Fantastic tutorial, Suzan! Thank you so much - I'm bookmarking it!
~ Zuzu
Love the sewing machine foot shot.
Now I just need a whole weekend to make one. No really they don't take that long. I certainly have tons of fabric. Now I just to need to make sure George takes them with him. I've told you before he's the grocery store man.
Great tutorial~
xx
C
Your bag is too pretty for the grocery store! I think it's a wonderful idea though. I have been saving some t-shirts to make bags out of, I really need to tackle that project, I always feel guilty when I am checking out at the store. Thanks for the push! I just linked up, I afraid I rambled on and on in my post but not enough sleep will do that to me! I'm hoping for a good nights sleep tonight so I have a clear mind tomorrow! Thanks for PG!! Theresa xoxo
just read your comment on Chania's blog Suzan. Have you heard this?
http://www.youtube.com/watch?v=fYi9Vr8bHJY
It will take me a little longer than one hour but I might try anyway! Yours is too cute for groceries!
how absolutely sweet of you to take the extra time to show the directions of making these bags. even tho,i do not sew, i think that is terrbily nice of you. they are such good directions. Bestest,Denise
I love reusable shoppping bags, use them all the time, but mine aren't that pretty!
Theresa
aka:TOT
Hi Z - day late, and a dollar short, I always am! I am doing up a reuseable tote bag for a friend's wine...maybe I will go ahead and post my tutorial as I get it done in the next few days. I LOVE reuseable bags, and have used the grocery store ones for the past few years - maybe it's time I make my own.
This idea has been lurking in the back of my head for a while. I might just have to pull out my sewing machine since you've made it easy for me!
Nice choice of fabrics!
i love it: voila! you say!! you make it seem easy ;)
your comment today was so nice...thank you so much
xo+blessings,
anne marie
Z this was a great tutorial. Even I understood it, so it had to be great. I know what all my kids are getting their gifts in this year. We try to be aware of ways to reuse at our house too, so there really isn't a lot of gift giving in the first place. Sad I know, but we already have so much of what we already need. My girls all like vintage and already loved stuff, so that's usually what I do for them. Not so with the grandchildren though. I can see making these for slipping the newest gadget into for them. Then they can reuse it for an overnight bag when they come to stay at gram's.
hugs to you...
Oh yes, and if you ever decide to sell that awesome piece in your last post...........
Thanks so much! I've been wanting to make some of these!
the tote is great...I've been wanting one for shopping...I only sew EaSy things so this will work really well...and I like the idea of having one for each of the g'kids stuff when they come over for a visit...thank you for making the instructions basic and simple!
Post a Comment